In order to speed up propagation of your favorite plant or to grow some "hothouse" plants in a "cool" greenhouse, you need to have a heated soil. Some other things you can achieve with heated soil is to accelerate growth on plants in outdoor frames or to get a head start on your seed grown annuals and vegetables. You may also wish to hasten the sprouting of your patio plants grown from tubers or bulbs.
All of these things can be achieved with the use of soil heating cables. These cables are a handy device to help you get the most of your gardening and to use present conditions to the fullest.
What are Soil Heating Cables?
Soil heating cables are available in a wide range of sizes, so it's possible to find exactly what you're looking for. These cables also come in different prices, so it's another thing to think about and choose the ones that suits your needs and budget.
Small cables are commonly sold as a unit with starter pots, flats and rooting medium. The larger types of soil heating cables are insulated and enclosed in plastic or lead. These cables are about 40 feet in length. To achieve the best results, it's also a good idea to use utility thermostat.
Large soil heating cables are typically made in several popular lengths. The most useful sizes are 40, 60 or 80 feet. Each cable is adapted to be used with ordinary electric service.
A 60 foot cable can typically heat a 6x6 foot hotbed. You may also choose to size the cable to suit your own space. Each 60 foot cable comes with an electrical load of about 400 watts. If you want to have this cable operating on a continuous (24 hour) basis, it will cost you only about few cents per hour. Consult someone in the power company to calculate the whole cost of using the soil heat cables in your garden, but the amount of money your spend on this will not be high. This is not an expensive addition to your garden.
If you choose to use a thermostat (which is recommended), the soil heating cables will turn off during the warm periods of the day. When the sun heats the hotbed or coldframe, the thermostat will turn off the current. As the spring approaches the thermostat will keep the cables working less and less.
Keep in mind that soil heating cables operated with a thermostat will keep the soil temperature at a constant level. In case the weather becomes warmer out of the sudden, the sun might heat the frame to a dangerous level. This is when you should control it manually by ventilating the frame. Simply lift the sash and slide wedges of wood between the frame and the sash. Some of the frames are equipped with permanent hinges or notched wood ventilators.
Installation
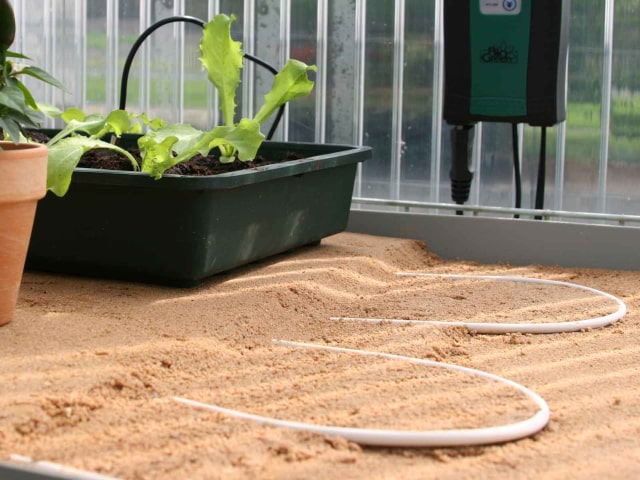
Installation of soil heating cables should be quick and easy. In case you are using an outdoor frame, simply check to make sure there's an ordinary light socket close to your frame. Simply lace a layer of sand on the floor of the frame. Lay the cable back and forth in loops over the frame. Cover it with another layer of sand.
As an added protection against breaking of the cable during shoveling, you should place the final layer over the sand. This layer should be made of hardware cloth (wire mesh).
After this, you should shovel the growing medium into the frame. After you're done, connect the cable and thermostat to the outlet. This is all you need to start using the soil heating cables.
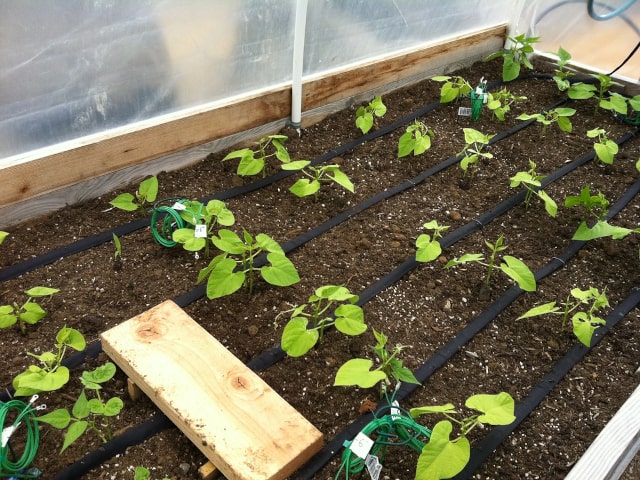
If you want to use a soil heating cable in a greenhouse, you may use it to heat an entire bench, a portion of the bench or just a fiat or two. Installation in these cases is the same as the one described above.
You may eliminate the wire mesh layer if you know you won't be using the shovel in the green house benches. An exception here might come when market crops are grown directly in the soil on the greenhouse floor.
Best Temperatures to Use
You may be wondering about the best temperatures to use for your soil heating cables. The answer will depend on what you wish to achieve and what kind of plants you want to grow.
You should germinate the majority of seeds, root cuttings or sprout bulbs at temperatures about ten degrees higher than the one recommended for growing mature plants. This will speed up the growth of your plants. Gloxinia tubers, tuberous begonias, amaryllids and caladiums will all grow rapidly when you give them some heat from the ground. In a similar way, cuttings of African violets, gesneriads of all kinds and cuttings of green plants (such as ivy and philodendron) will also benefit from the heated soil.
Additional Heating Tips
To conserve heat on outdoor beds, make sure that the framework construction you use is tight. Bank the sides with earth or some other heat conserving material. The sash should be fit tightly. If it's not tight, "weatherstrip" the top of the frame with some felt or strips. You need to make sure that the glazing is well puttied, just like the greenhouse. Laps should be one-fourth inch at joints. To admit maximum light, keep the glass clean.
In case the weather becomes too cold and windy, you should give the frame additional protection. Add more sash over the top of the permanent sash. You may also add a covering made of mats ore straw. This should be helpful during the evening.
An ideal greenhouse propagating unit is to mix a flat of equal parts of sand, peat moss and sphagnum moss. Heat it with a small, 6 foot plastic covered cable. You can put any type of cutting or tuber into this propagator. The temperature control should be set at 75 degrees F.
Early in the season, make sure to pay extra care when watering outdoor hotbeds. Excessive watering may damage the plants and make them damp off. More water is required on bright days. Also, keep in mind that all plants grown in a hotbed should be hardened off before you plant them in the outdoor garden or before you pot them.
9 Comments
I have a Parasene cable in a sand bench in the greenhouse. I think the cable length was 3m, the bench measures 6' x 2' approx. I'm reluctant to turn it on given the cost of electricity in the UK at present, the unit is rated at 3amp. Can you advise please the approximate cost of running the cable at around 20*c?
Can I use these cables in an outdoor tree box for arborvitae to heat the soil or roots to keep from freezing?
What happens if I do not use sand for the cables? I want to use it for my greenhouse. Thanks
Do you know where I can purchase a soil heating cable in a 60ft+ length? I feel like I've looked everywhere, but can't find one that long. Any feedback is appreciated!
Hi, I have tried to find a place to buy heating.
Do I need sand? What is I just bury it into a growing medium?
The soil warming cable is to long, I will HAVE to cut it to be able to use it... What do you advise??
Can I use these cables in the garden (no frame) for a specific area? I have just bought a tree fern and planted in the garden. I am unsure if I should dig up and plant in a pot to protect from frost in winter. I live north England (Yorkshire). Temperature typically doesn't go below -5C. this is my first attempt at doing anything with the garden !!
Thank you in advance,
Auda