Many gardeners wish to start their perennials from seeds, but it seems too complicated. Contrary to the popular belief, however, it doesn't take special skill nor equipment. Actually, starting plants from seed is very easy.
Starting from seed offers numerous benefits for gardeners, so it's surprising not more people consider it. Some of the main advantages include saving money (seeds are cheap and you can easily share them with your friends). This is also a great way to learn how to grow your own perennials. Also, don't forget that many plants have to be grown from seed because otherwise they are unobtainable or difficult to propagate in any other way. Seeds are easier to establish than large plants. An inexpensive, ready source like seeds is a good way to make you experiment and try different gardening methods.
Some people assume it's more difficult to start perennials from seed than it is to start annual flowers and vegetables. This is simply not true. It's actually as easy as starting bean in a cup.
Suitable Plants
While perennials are not so difficult to be grown from seeds, there are some plants that are more suitable than the others. Here are 10 perennials that are very easy to grow from seed:
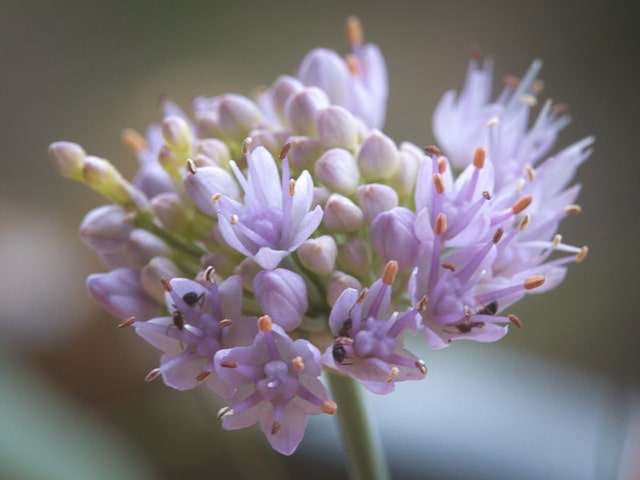
1. Allium Blooms (A. schoenoprasum)
These plants thrive in USDA hardiness zones 3 to 11. They can grow from 4 to 60 inches in height, depending on species and variety. There are dozens of varieties you can try, and all of them are great to start from seed. They have fibrous roots you can't let to dry out, so this is why you won't be able to find them in bulbs bins. It's best to start their seed in late fall to mid-winter. Remember, if you start them in the spring they might not emerge for a whole year.
2. Penstemon (Penstemon barbatus)
These plants thrive in zones 3 to 10 and it can grow 3 to 72 inches in height and 6 to 24 inches in width, depending on species and variety. It requires fertile, well-drained soil and full sun to partial shade. This genus tends to be short-lived, so starting from seed is a great way to have them for a longer time. Most of the plants in this genus benefit from a long winter freeze.
3. Delosperma cooperi
It thrives in zones 5 to 11 and it can grow about 2 and 5 inches in height. It spreads a lot so it can be used to cover the ground. It needs sharply drained soil and full sun. You also need to make sure it's protected from wind. This is a fast growing species and while it's possible to start it from cuttings, it's better to grow them from seeds. Seeds planted in warm weather will germinate quickly and bloom in a few months if you provide them with some fertilizer. In cold areas, plant them in the first half of the summer because they need to be established to survive their first winter.
4. Primrose (Primula sieboldii)
These plants thrive in zones 3 to 8 and can grow 2 to 18 inches tall and 6 to 20 inches wide. It requires moist, well-drained soil and it grows well in full sun to deep shade. This is a garden favorite but it might be difficult to grow. However, starting from seed is easy.
5. Silene (Silene armeria)
These perennials thrive in zones 3 to 9. This plant can grow 2 to 32 inches in height. It requires moderately fertile and well-drained soil. It's best to be grown in full sun to light shade. There are many varieties to choose from (both small and giant), and they require different growing conditions. One thing is true for all of them, though: they are all best to be started from seed.
6. Dianthus gratianopolitanus
These plants thrive in zones 3 to 10 and it can grow 3 to 28 inches in height, depending on the exact variety. It requires neutral to alkaline soil with good drainage. It can be grown in full sun to light shade. It's best to start them in mid winter and germinate quickly, so they are ready early in spring. This genera is prone to tangled roots, but you can easily separate them without the plant suffering from shock.
7. Draba aizoides
This plant prefers zones 4 to 6 and can grow about 4 inches in height and. It requires full sun and well-drained soil. These miniatures can grow well in a niche in a rock wall. They have spiny rosettes and look lush green leaves during the winter. It's best to start their seed in December or January for spring germination.
8. Russell hybrid lupine
This plant requires zones 4 to 8 and it can grow 4 to 6 inches in height and width. It thrives in full sun and average, moist soil. These plants are often difficult to get to come back a second year, which is why it's best to start them cheaply from seeds. These are legumes, so their seeds are large and bean-like. They can be a bit slow to germinate without winter stratification, so it's useful to abrade the seed coat lightly with sand paper to allow water to penetrate it and speed germination.
9. Aquilegia caerulea
These plants thrive in zones 3 to 8 and can grow 4 to 36 inches in height and width, depending on variety. They need fertile, moist and well-drained soil and full sun to partial shade. The key to starting them is to make sure you have fresh seed (less than a year old). It's best to start it in winter for successful spring germination.
10. Eriogonum umbellatum
These plants thrive in zones 3 to 11. Depending on the species and variety, they can grow from 3 inches to 5 feet tall and wide. They require full sun and poor, gritty and sharply drained soil. This is a long-lived and very adaptable perennial so it can thrives in humid climates. It's best to start seeds in winter. With some freezing and thawing, they will produce seedlings in April and May and produce husky plants by the end of the summer.
When and Where?
One thing you need to remember is that good germinating and growing your seedlings often means using the most natural conditions a plant might encounter in the wild. This is why it's best to plant your seeds in the pots outside rather than indoors.
When it comes to timing, most of the cold-hardy perennial seeds prefer a long cold period before they germinate. This is why it's best to start them in December or January and give them enough time before the spring.
Most of the perennials actually benefit from a very basic seed-starting method, so there's no special "magic" or care you need to perform.
Starting the Seeds
While each genus has its own requirements, here are some basic tips on how to start perennials from seeds:
- Make your own mix. You should make your own seed-starting soil for perennials. This is fun, easy and it saves you a lot of money. Premade mixes tend to be expensive and you don't really need them. To make your own mix, take two parts compressed, peat-based soiless potting soil. Place it in a thug or wheelbarrow. An acceptable substitute is coir. Add one part clean, washed sand to this mix. Ideal sand is the one used for children's sandboxes. This will improve drainage. You should also add a tablespoon of slow-release fertilizer pellets for every cubic foot of ingredients. This will provide ongoing nourishment for your plant. Mix this all together. It's best to use packaged materials that are clean and sterile to produce a light and crumbly mix.
- Use a topdressing of gravel. This will help the seed get started. You should take a plastic pot you have at hand. Fill it loosely with potting mix flush to the brim. Tamp the soil and leave about quarter inch of space below the rim. You should sow the entire packet of seeds into a single pot. Larger seed (lupines, for example), should be sown directly on the soil mix. Top-dress the soil with sterile aquarium gravel (BBs size works the best). Fine seed can be sown directly on a topdressing of the gravel. Don't bury the seeds. Using this topdressing method will keep the soil beneath evenly moist and it will provide a sterile zone for the stems of your germinating seeds. This will minimize damping off, a bad fungus that can cause mass seedling die-off.
- Water gently. You need to make sure not to disturb the seed scattered on the topdressing. This is why you should water the seed pots patiently, from the bottom up. Use any shallow basin filled with just enough water to rise to about an inch below the seed-pot rims. Let it soak for about 15 minutes until the soil is wet to the top.
- Protect the seeds. You need to protect your seeds at all times. Place them in a sunny area to protect them from wind. If the winter weather is too dry, you may have to water the seed pots a few times with a spray. Be patient. Remember, some plant species and genera need several seasons to germinate.
- Prickling out. You need to prick out individual seedlings. This is when you separate the seedling in the pot they were sown in to individual small pots you'll use to grow them into strong plants. It's best to use pots that are about 2 1/4 inches square in size and filled with a sterile potting mix. These should be used for single, individual seedlings. To repot your seedling, carefully pull the root ball of seedlings apart. Place each individual seedling into its own pot. You need to protect the new seedlings from any excessive summer sun. It's best to use a shade cloth for over a month or two. This will help them adapt better and survive the shock of potting. Once they have had time to expand their roots in these small individual pots, they are ready to be planted in the ground.
Photo credit: hedera.baltica
0 Comments