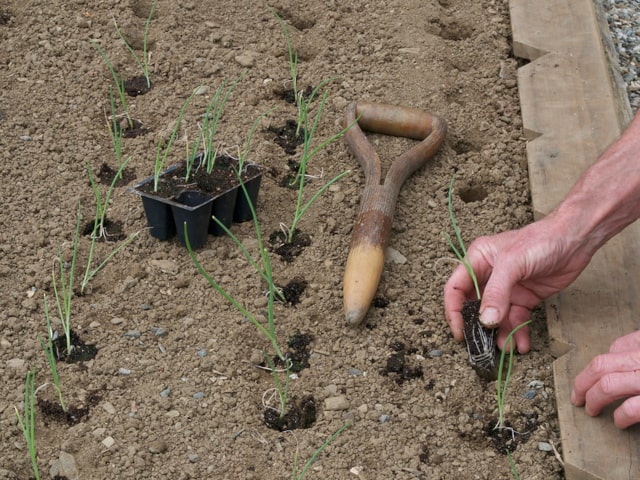
For many people, the easiest way to start your onion growing career is to start from sets. These sets are small, immature onion bulbs you can plant easily. They are ideal for beginners because they are very easy to care for so anyone can have onions in their garden without much trouble.
If you're only starting out as an onion grower, these sets are the best choice for you. It may turn out that you will never want to move to something else. Nothing wrong about it: starting onions from sets is easy, practical and gives you plenty of fresh onion for all your culinary needs.
However, there's one big problem with onion sets: they usually come only in a few types and varieties. If you want to start your onions from set, you are faced with a very limited choice. To choose between more varies types of onions and to be able to grow a variety of your choice, you will have to start your onions from seeds.
Growing Onions from Seed: The Advantages
Growing onions from seed may be more challenging and complex, but it also gives you so much freedom and varieties of choice. If you choose to grow onions from seed, you will be able to pick onions of a specific shape, color and size you are interested in. Not only that, but you you will also be able to pick a variety based on other features (early-season, late-season, etc.) When it comes to diversity, starting your onions from seed is the best choice.
Another advantage to onions started from seed is plant health. Onions started from seed tend to be less prone to disease, so it's another thing to keep in mind. Also, these onions are known to bulb up faster and they also store better.
Indeed, there are many different varieties with many different features to choose from. When it comes to color, you may choose between pure white onions, various shades of yellow, to dashing purple onions. You may also choose various sizes and shapes, such as plump Ailsa Craig Exhibition or the bottle-shaped Italian Torpedo.
Different Varieties
One of the most important choices you will need to make is the variety you want to start from seed. There are so many varieties available that you will need to take some time to choose the best one for your needs. It's fun to go through a seed catalog to pick the best ones for your family.
Also, keep in mind that onions need a long growing season so it's best to place your seed orders early so you can get a head start on the growing season.
When choosing the best variety to grow, don't forget your climate conditions and your zone. Remember, onion varieties require different length of daylight and the temperature to make a bulb. There are the so-called "short-day" types that don't require much sunlight, so they are ideal for places with cold fall and winter months. They will bulb when they receive 12 hours of sunlight, which happens with the warmer, summer weather. The "long-day" types are great for places with longer summer daylight. These onions require at least 14 hours of light to bulb up. They will grow foliage in the spring and bulb up in the summer.
In case the short-day varieties are grown in a warmer weather, they will bulb up too early, but then they will languish so they will never get to the optimal size. Now, it may be exactly what you want (for example, if you want pickling or pearl onions), so it's not a mistake per se. In case you grow long-day onions in places with colder weather, they will produce lots of leaves, but almost no bulbs.
When choosing the onion variety you want to grow, in addition to climate conditions you also need to know how you want to use onions in your kitchen. Each variety is ideal for some culinary uses but not the others.
Here are some of the most popular onion varieties you can grow:
- Copra. This is an early onion and it has blocky globe bulbs of a medium size. Their skin is dark yellow and the bulbs are rock hard. Ideal for storing. This variety has the highest sugar content of the all storage onions. (104 days to maturity).
- Sweet Sandwich. This is a globe-shaped and very sweet onion. It can easily be stored and it's ideal for cooking and sandwiches (105 days to maturity).
- Red Baron. This is a big, purple-red onion. Great for storage. (108 days to maturity).
- First Edition. This is a medium-sized onion with pungent flavor. Good for storage (105 days to maturity).
- Ailsa Craig Exhibition. This is a round, huge, snow-onion with a straw-yellow skin. The taste is mild. This onion type should be stores in the late fall (110 days to maturity).
- Lancastrian. The so-called "football onion". It averages in size of about 5lb. It's crisp, sweet and ideal for stuffing and onion rings. Can be stored only for a short while (95 days to maturity).
Starting Onions from Seed
Most of the time, you will need to start your seeds inside the house. It depends on your climate, of course, but typically, the climate will be too cold in January and February to be able to start your seeds outdoors. On the other hand, waiting until mid-May to start seeds outdoors is too late.
This is why it's best to start the seeds inside, about two months before the last frost. For most people, it's best to start seeds in January or February. It's important to do it like this, or you will end up without quality bulbs to harvest.
To start the seeds, sow them about 1/4 inches in flats previously filled with soilless potting mix. It's best to cover the flats with a plastic top. This will preserve the moisture your onion seeds will need to grow. Place the flats on the heated floor or the sunroom.
It's important to know that onion seeds germinate in about a week, provided they are on a temperature of about 70 degrees F. You will soon see stringlike tops poking though the soil. This is when you should change the growing conditions. Remove the plastic top and relocate the flats to a cool place (such as an attic or a garage). You will need to place them under fluorescent light: one warm white and one cool white bulb per fixture. It's best to keep these lights just above the leaves. As the plants grow, you should adjust the lights.
Another thing to do is to feed your seedlings with a water-soluble fertilizer at half strength every other time you water. Keep in mind not to keep the seedlings too wet. Observe your onion seedlings and watch them grow.
When the seedling leaves are about 5 or 6 inches tall, it's time to transplant them. It usually happens in mid-March. Keep in mind that you have to be very careful, because onion seedlings are very fragile. It's a tedious job so some people choose to skip it and go directly from flats to the garden. However, transplanting your seedlings into six packs first offers advantages. It gives each plant its own growing space, so they have a better chance to grow strong roots.
When transplanting, overturn the flat carefully to expose the seedlings' roots. It's best to handle the plants by the leaves. Gently tug to separate the roots of individual plants. After this, tuck each of the plants into the new cell without damaging the roots.
After the seedlings are on their new place, snip the leaves back to about 4 inches with scissors. This will prevent the plant from becoming too top-heavy. This is also a way to ensure that more nutrients will go to the roots instead of the leaves.
Continue watering with half-strength soluble fertilizer and keep the transplants under the lights. In case the weather allows, you may also move the transplants to a cold frame. Keep in mind that onions are cold-hardy plants so they can tolerate cold temperatures. However, you should usually wait till mid-April to move them to a cold frame. It's best to locate the cold frame in the south side, so they can receive the full sun. It's essential for growing strong onion plants.
Once you have started your onions from seeds and once you have your transplants strong and healthy, it's time to move your onion plants to the garden. If your climate conditions allow, you may choose to put the transplants in the ground early (not to mention that people living in very warm climates may start the seeds directly in the ground). Typically, however, you will need to wait till mid-May to plant your onions in the garden. By that time, they should be about half the size of a pencil.
Onions need soils that's very hight in organic matter. It doesn't matter whether you start them in the garden from transplants, sets or directly from seeds: you will need to provide soil high in organic matter. Another thing onions require is well-drained soil. They should not stay in water after a rain, for example.
Onions thrive in a fertile, loose loam. The ideal pH values are 6 to 6.5. It's also important to work in a 5-10-5 fertilizer or an organic fertilizer to help your onions grow and become strong.
The transplants should be planted about 1/2 inch deep, 4-6 inches apart. In case of larger varieties (producing larger bulbs), place them 6 inches apart. In case of smaller ones, 4 inches is enough.
When they are in the ground, cut the top-heavy leaves back to about 6 inches. It will prevent the heavy tops and it will give the plant more energy to grow the bulb instead of leaves. You can do this thinning of leaves as the summer progresses. Remember, you can use leaves in the kitchen, so don't throw them away. They are great for salads and cooking.
You may plant single or double rows of onions, depending on your space and preferences. Planting in rows (as the opposite of beds) is great because it requires less work - rows are much easier to weed. It's important to keep the onions well weeded because otherwise the onions will compete with weeds for resources (light, water, and nutrients). To avoid damaging the delicate and shallow onion roots, make sure to pull weeds by hand.
To make your onions thrive, make sure to provide them with water and nutrients. Keep the soil surface evenly moist. They should receive at least 1 inch of water per week. They should have a constant supply of moisture during the bulb-enlarging stage. In case the soil is too dry it will put the plants under stress, and it will result in smaller bulbs with a stronger flavor. In case you experience a dry season, you should mulch the onions with grass clippings or leaves. However, make sure to keep the mulch away from bulbs to prevent rotting and diseases. Also, as your onions grow and mature, make sure to brush the soil away from their bases. It's important that each onion plant perches on top of the ground.
Remember that onions are heavy feeders. You should feed them during planting, but they will sure benefit from fertilizing when the bulbs begin to swell. Another thing you may introduce is a bit of a side dressing of manure. Onions need adequate doses of potassium or else their necks will thicken, so the bulbs won't store well.
When the onions start to mature, you should ease up on water and fertilizer. This will encourage dormancy. Also, as the onions mature, you should pull the soil away from most of the bulbs. Leave only the roots and the lowest part of the bulb in the dirt. It should look like the onions are sitting on top of the soil. It's important to do this to encourage the drying process by keeping the soil away from the onion skin. Also, to get the best and healthiest bulbs, rotate the crop yearly.
When it comes to pests, keep an eye on any potential pest problem. Onion maggots are a frequent problem so to avoid them, don't plant too early in the spring. Also, you may consider using row covers to prevent the egg-laying flies. Other than this, onions tend to be pest and disease free plants, so you should not have many problems with them.
Harvesting
Harvesting should usually be done at the end of August. Remember: your onions will go dormant at full maturity. The inner leaves will stop producing blades, and the hollow, center neck weakens. This will cause the tops to bend over. You have to allow the plants to go dormant before harvesting. You need to allow the onions to go dormant or else they won't store well.
When the tops are started to brown, with toppled tops, the bulbs will develop skins. This is when you should tip bulbs over to break the roots. This will speed up drying. However, it's important not to bend the tops over before the bulbs are mature, because it will only open the risk for a disease.
After the tops have withered, you should pull the bulbs out of the ground and place them in a warm, dry and airy location. When you take them out of the ground they will need some time to cure before they are ready to be stored. Make sure that they should be out of direct sun and with no contact with moist soil. You may spread onions out on a screed and dry them on a warm porch or in a garage or a shed.
It can take up to three weeks to cure your onions before you can store them. Once they have dried up, you should cut the foliage back to about 1-2 inches from the top of the bulb. In case you want to make a decorative onion braid, however, you should keep the tops on.
Store the crops in a cool, dry location. Make sure that the chosen location has a good air circulation. You may store the onions in a traditional onion bag or in a shallow box. Make sure to use newspaper to divide the bulbs. Alternatively, you may place an onion in a pair of old pantyhose and tie a knot above the onion. Make sure to tie knots between each bulb. When you want to use a bulb, simply cut below the knot.
Keep in mind that not all onion varieties are good for long-term storage. For example, the large, sweet varieties such as Ailsa Craig Exhibition or Lancastrian have to be used in a couple of months after harvest. As a general rule, onions with thick necks should be used soon. Those varieties suitable for long-term storage have dry, firm bulbs with tight necks, and layers of protective skin (yellow or brown). These onions are typically sweet and pungent and they become milder the longer they are stored.
Photo credit: Distant Hill Gardens
0 Comments