Orchids can sometimes form a keiki, and you should know how to react in this situation. What is a keiki? This term comes from a Hawaiian word meaning "child" or "baby". When it comes to orchids (such as phalaenopsis orchids, dendrobium, and epidendrum orchids, and also many others), a keiki can form on the plant and it's identical to the mother plant.
How is a Keiki Formed?
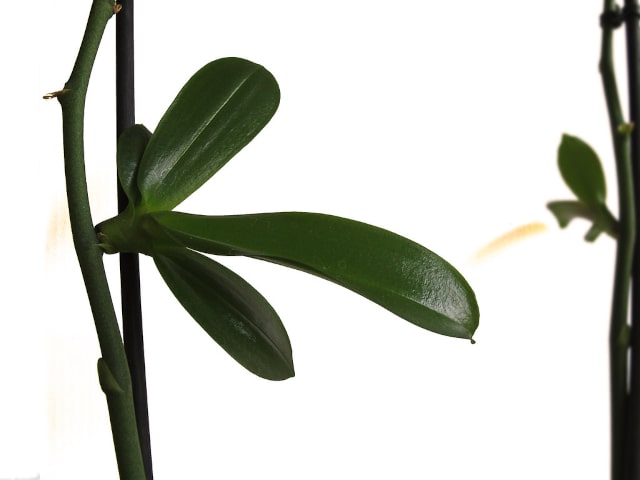
A Keiki is formed on an orchid due to the accumulation of the growth hormones. This always happens at the a node of an orchid plant and a keiki develops. You can easily track its development directly on the mother orchid.
It's important to know that you can easily remove a keiki if it forms on your orchid. You should do it carefully, but later you can plant it to grow on its own. Alternatively, you can leave it to grow and flower on the mother plant. However, removing a keiki and starting a new orchid is usually a better solution.
How to Remove a Keiki
It's important to know a Keiki can be safely removed, but you need to do it carefully and with some consideration. If it's removed too early, it may not be strong enough to survive the transplant and grow into a new, individual plant. For this reason, it's important to wait until a keiki has a few small leaves and roots that are 2-3 inches long. Only when you observe these things is a safe time to remove a keiki from its mother plant.
To remove a keiki, use a sterile cutting tool and cut the cane about 2 inches above and below the keiki. This will remove it from the mother plant quickly and effectively. In order to prevent potential fungal infections, it's important to apply some fungicide such as cinnamon or another fungicide to all the areas that were cut. This will keep the plants safe.
How to Pot a Keiki
When you remove a keiki, plant it in a 4 inch pot. As a potting medium, it's best to use bark, sphagnum moss, peat moss, cork or a commercial orchid pitting mix. Make sure that sphagnum moss is damp before you pot the plant.
When planting, fill the bottom of the pot with a bit of moss. After that, make a ball of moss a bit bigger than the pot. Wrap it around the keiki. It's important that the moss is tightly packed into the pot. It should serve as a support for the keiki so it has to be tightly packed. As the plant grows and matures, you will probably need to switch to bark as a potting medium.
How to Grow a Keiki
Once you pot a keiki, make sure to never expose it to much direct sunlight. Wait until you see some signs of growth before you expose it to light. Once you see it growing it's important to start increasing the amount of light it receives every few days. When the keiki is well-established you can expose it to the same amount of light as the mother plant.
After you observe the leaves showing sign of growth, you should add fertilizer. Don't fertilize before you see the leaves growing.
This will keep your keiki happy and it will grow and thrive. It takes about 2 years for a keiki to become a mature flowering plant, so take a good care of it to see it bloom.
Photo credit: jacinta lluch valero
7 Comments
Need Help! Orchid died. No roots, crown rot. Formed Keiki that started to fo blooms but has no roots of its own. What do I do?? Please advise
I have a Keiki on an orchid that has died, it has no roots yet. I don't know what to do to keep it from dying as well. HELP!
I have a Keiki growing half way up the mother stem with roots & leaves, do I cut off the mother stem below the Keiki if I want to replant? Or just cut off the Keiki where it is growing out of the mother stem ? Keiki has just started to developers flowers too
Is it necessary to use moss for the transplant? Will the baby not thrive in good orchid mix? They look so healthy and have amazing roots. Someone please let me know your experience.
My orchid is having 2 Keiki's on its stem. But the stem is starting to become yellow. I want to remove the Keiki's and repot them but they are still young and haven't developed any roots yet.
How long after will the mother bloom again after the baby is removed from the plant?
Good day I have a moth orchid which has now started two small plants on the original flower stems. The one has already flowered before it made leaves and it has now got two leaves and a very small root the other one has started with leaves with no indication of making a flower jet. Could you please give me some advice what to do or should I leave it growing on the original plant