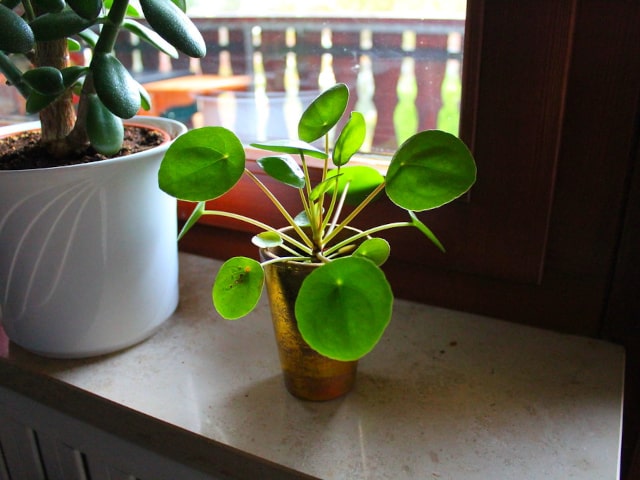
Pilea is a beautiful plant that is present in many homes. It is not surprising that many gardeners wish to propagate it to get more new plants. However, you need to know how to propagate Pilea plants properly. While they are not the most difficult houseplants to propagate, there are certain tips and tricks you can use to make this process as smooth as possible.
Propagate Pilea with Cuttings
There are several methods to propagate Pilea plants, but taking cuttings is the most effective. It produces the best results and it has the most success of any form of propagation. It is also a relatively easy method to use, so even beginner gardeners can try it.
If you wish to propagate Pilea plants, it is advisable to do it by taking cuttings from the mother plant. However, simply cutting with a knife is not enough. There are some tricks you can use to improve your success and to make your new Pilea plants strong and healthy.
Quick And Easy Pilea Propagation
Here are the top 10 tips and tricks that will make Pilea propagation quick and easy:
1. Choose the Cuttings Carefully
Pilea plants are known for their cute baby plants that can pop up year round. These baby plants are what is used as cuttings when propagating Pilea. The baby plants can sprout from the stems or from the roots of the adult Pilea.
However, it is not advisable to take baby plants as soon as they appear. Such plants do not make good cuttings, and they don't have a good chance of survival. A good cutting is the one that is strong enough.
It means that you need to wait for a few weeks once a baby plant starts growing so it is big enough to be used as a cutting. Once it is ready, you can simply remove it from the mother plant.
2. Choose the Time Carefully
Technically, if is possible to propagate Pilea any time of the year. However, for the best success and to trouble your plants the least, it is highly advisable to do propagation in the spring. This is a time when the plant is on its strongest and it grows the fastest.
It also means that it will produce the most baby plants that you can use for cuttings. This is very important, because not every single baby plant might be suitable for propagation and would not make a good cutting. By allowing the plant to grown more, you are giving yourself a choice so you can pick the strongest and most likely baby plants to use for successful propagation.
3. Take Cuttings Gently
When you see that the baby plants are large enough, you can use them as cuttings. It means you can simply remove them from the adult plant.
However, this needs to be done with care. Make sure to do it gently, and using sterile and sharp scissors or a knife. The goal is not to disturb the cutting or the mother plant too much.
4. Know How to Root Cuttings
One of the most important steps when you wish to propagate Pilea is to know how to root cuttings. Once you have taken them from the mother plant, you need to ensure that they grow roots of their own.
The best way to do it is to place the cutting in water. However, make sure that the leaves do not touch the water surface. This is particularly true for cuttings taken from the stem, because these typically do not have roots of their own, unlike cuttings taken from the root of the mother plant.
Once in water, keep cuttings there for about one to two weeks. Make sure to change the water often to keep it fresh and sanitary. This will encourage healthy rooting and it will greatly improve your chances of success with propagation. Also, keep in mind that rooting can take about a month, so be patient.
5. Know How to Plant
Once the cuttings are ready and have roots, it is time to plant them into the soil. Make sure to use a mix of soil and perlite, or another potting mix option that has good drainage. A tropical soil mix or all-purpose soil can also be good options if they drain well. Also, make sure that your chosen container has drainage holes at the bottom.
6. Don't Overwater
One of the most dangerous things is to overwater your Pilea plants. This is true for cuttings, too. Keep in mind that these are essentially succulents, so do not water your new plants until the soil mix has completely dried out. Before you water again, always check the soil. You should not water more than once per week.
7. Water from the Bottom
Another tip about watering: always make sure to water your new plants from the bottom and not from the above. You can let the plants sit in water until you notice that the top of the soil is moist. After this, make sure to remove excess water. You should not let your Pilea plants sit in water for too long.
8. Keep Your Pilea Plants Away from Direct Sunlight
Once you have planted your cuttings, make sure to place them in a bright spot. However, the light must be indirect: direct sunlight is dangerous because it can burn the leaves of your plant. A good choice would be a northern or eastern window with low or moderate light. If you wish to use a southern or western window, make sure to have blinds or sheers so the plants are not exposed to too much light.
9. Rotate
A great way to make your new Pilea plants stay symmetrical is to rotate the pot occasionally. This is particularly important if the container is positioned in such a way that the plant receives light from only one side. Rotating will ensure that it keeps an even shape as it grows.
10. Observe Your Plant
If you wish to propagate Pilea, keep in mind that you will need to dedicate some time and patience. You will need to observe your plants for changes and to know that successful propagation takes time. It typically takes about a month for a new Pilea plant to establish itself in the soil. It will probably take longer than that until you can notice your plant growing its own roots and leaves, and eventually, its own baby plants.
Photo credit: Impluviatus22
0 Comments