Asparagus ferns are great house plants you can grow in your home or garden. Asparagus ferns (Asparagus spp.) are close relatives to garden asparagus that is used for food but have unusual fluffy fronds with soft needles. This is what sets them apart and makes them into very attractive plants you will want to grow in your home or garden.
Basic Plant Information
There are many different varieties you can grow. The most popular ones are the cascading
Sprengeri (Asparagus densiflorus "Sprengeri") and the striking plumed foxtail fern (Asparagus densiflorus "Meyersii"). There are some notable differences in these varieties when it comes to the appearance but the care instructions for both are basically the same.
If you wish to grow Asparagus ferns keep in mind that they will grow well in the U.S. hardiness zones 8 to 11. However, keep in mind that your fern will thrive in hardiness zones from 9b to 11.
Keep in mind that your Asparagus fern will do great outdoors but you may also grow it inside of your home. They don't demand much care and can do well as potted plants. The only thing you need to keep in mind is that a healthy fern will grow strong roots that will become too large for the pot at one point.
Detangling the Roots
When the roots become too much for the pot you will need to make a bit of an effort to untangle the packed root ball. Luckily, this is not too difficult so even beginner gardeners can do it. All you need to do is to follow a few simple steps.
Here are the things you will need:
- Sharp, clean shears and/or a knife
- Serrated knife or hacksaw
- Warm, soapy water
- Bleach
- Pots for ferns
- Potting soil for houseplants
One warning: it is important to wear gloves when handling Asparagus ferns. They have small, sharp spines on the foliage that can hurt you.
These are the steps you need to make to detangle Asparagus fern root ball:
1. Inspect the Plant
The first thing you need to do is to inspect your Asparagus fern. Start by observing the center of the plant at the soil level to see how it looks. It is best to do this during the spring when your fern develops new growth. Water your plant thoroughly and see what happens. If you see the water running to the sides of the pot instead of simply soaking into the soil, it is a sign that your fern has packed roots. You should be highly suspicious if the soaking of the soil is very slow.
Keep in mind that Asparagus ferns generally like to be a bit crowded but roots that are highly packed are not a good situation to be in. Such a packed root ball prevents water and oxygen from penetrating the mass and as a result the plant cannot get all the needed nutrients. It makes the root ball become dry, which can lead to the plant death if you don't untangle the roots.
2. Prune Your Plant
The next step is to prune your Asparagus fern. Make sure to use clean and sharp shears. The level of pruning is up to you. Some people prefer to just trim a little to shape their fern while others choose to cut all stems back to be just a few inches above the soil level. Excessive pruning is only recommended in the spring, when you want to rejuvenate your large Asparagus fern. When pruning, make sure to clip any dead fronds off all the way down to the soil level.
3. Remove Your Fern from the Pot
It is time to start detangling the roots. In order to do it, you need to remove your fern from the pot first. It is best to do it by simply grasping the plant gently by the main stems. Make sure to do it gently and near the soil level. Once you have stems in your hand, lift the plant gently upward to remove it from the pot.
In case the root ball is so tightly packed it might be difficult to remove the plant easily. If this happens, simply thump the side of the pot while still holding the root ball in your hand. This should help you remove the fern from the pot.
4. Clean the Pot
Once the fern is out of the pot, place it on a flat surface where you intend to work. In the meantime, wash the pot thoroughly with warm, soapy water. Make sure to rinse is properly if you want to return the fern into it. In order to clean it properly, make sure to soak it in a 10 percent bleach and water solution for about 10 to 15 minutes. Rinse thoroughly and leave the pot to dry completely.
5. Examine the Root Ball
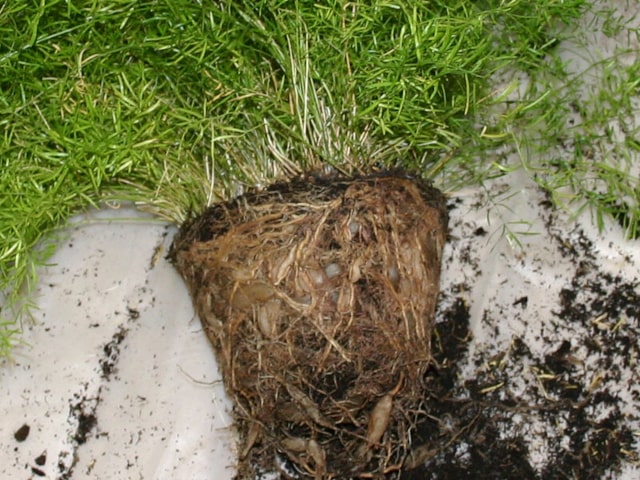
Take some time to carefully examine the root ball. Chances are that you will need to do some root pruning to be able to detangle the root ball and return the plant to the same pot. It is best to trim about an inch off the root ball all the way with shears. Keep in mind that Asparagus ferns are hardy plants that can benefit from some root pruning.
On the other hand, if you want to return the plant to a larger pot, make 4 or 5 one inch deep vertical slices in the root ball. Make sure to cut from top to bottom and use a sharp, clean knife. It is also important to space the cuts out evenly. These cuts will go through a large part of the packed root ball and encourage healthy new growth.
6. Divide Your Fern
This is a good time to divide your fern if you want to. To divide your plant, simply part the fronds at the soil level. Cut straight through the root ball vertically. Make sure to do it with a strong knife or even a hacksaw. This will produce two or three new plants. They will generally have very dense roots so they are strong enough and the cut ones will not make a problem.
7. Repot the Plant
Before you return the plant to the pot, make sure to remove any old potting soil from the remaining roots. Do it with your fingers so you don't harm the plant. You may choose to move the fern to a larger pot or to keep it in the old one. If you want to return it to the old one make sure that there is enough of the tangled root ball removed that it makes a difference. If you divided your plants you should move each division to the individual pot.
It is best to use a nice potting soil made for houseplants. Add the plant and potting soil carefully. Make sure to position your fern at the same soil level it used to occupy in its original pot. After you plant it, water your Asparagus fern thoroughly and return it to its regular spot.
Photo credit: Toofercat


3 Comments
What are the little bulb sorta things in the roots? Can I plant them?
This did not touch the issue of the white carrot like roots overpowering the pot. I call them potatoes. There are so many potatoes on two that I had outside that they did not have new growth.