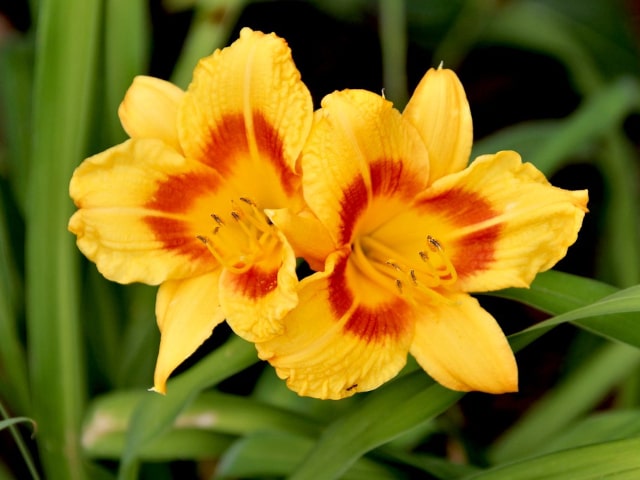
The Daylily is a wonderful plant many gardeners choose for their home. Traditionally, a daylily is known to produce bright, yellow flowers. However, today it's possible to have daylilies in numerous other colors, so you can make your garden truly colorful with them. This is a perfect plant for the balcony or garden.
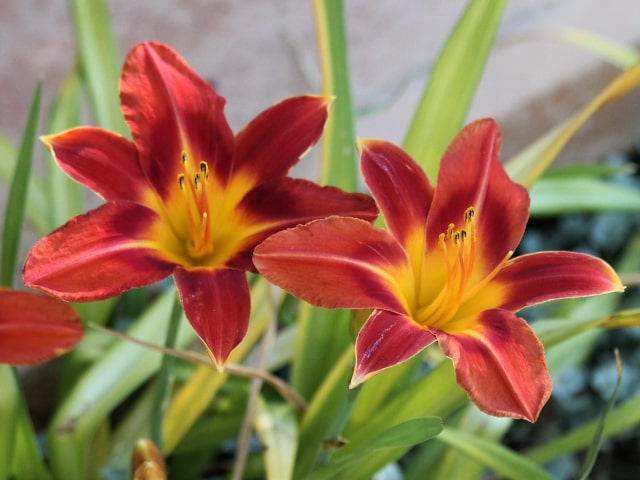
A Daylily prefers to grow in full sun to produce the best color. It's particularly true for bright colors such as yellow, light pink or peaches. When it comes to deeper and darker flower colors such as red and purple, it's best to keep your plants in some shade, especially during afternoon.
Light Requirements
When it comes to the amount of light they require, daylilies thrive in full sun, so it's best to provide them with plenty of light. However, they can tolerate partial shade so if you grow them in these conditions you don't have to worry about your plants being damaged. The only negative thing that may happen is a somewhat slowed growth when they are places in a partially shaded area.
Like it's said above, the light and shade are important for the flower colors. The lighter the flowers are, especially if they are yellow, pink or peach, the more sun they need to bring the full colors. If you grow plants with flowers in deeper colors, such as reds and purples, it's best to place them in a partially shaded area. This is particularly important for the afternoon sun, because it's the strongest and brightest so it may not be best suited for the deep colored flowers.
Pot and Soil Requirements
To make your daylilies thrive it's best to use high-quality potting soil with organic compost. It's also advisable to amend the potting mix with the compost before you plant your daylilies.
It's best to use well-drained but moist soil. It's also important to make sure that the soil has good aeration and lots of microbes to ensure a good microbial activity. The compost can be used to improve the potting mix so it will provide ideal growing conditions for your plants. You may even buy a potting soil that includes compost. These pre-mixed soil and compost products are a good choice because they save time and effort. Such a mix will be everything that you need to make the daylilies thrive.
Sometimes, a potting mix is good but it has a problem staying moist. In cases like this, it's best to use some sort of polymer crystals made to absorb water and release it back into the soil. It's important to provide moist soil for your daylilies, because this is how they give the best quality blooms.
When it comes to pots, it's best to choose the one that's at least 12 inches in diameter and dept (for smaller varieties) and 16 to 18 inches for larger varieties. It's best to use glazed pots or plastic ones and not terracotta. Terracotta pots look beautiful and they are a good choice for some other plants. However, they dry out quickly so they are not the best choice for daylilies.
Planting Daylilies
In case you have purchased your daylilies via the Internet or mail order, you will receive a bareroot plant. To pot it in the best way, you should make a mound of soil in the center of the pot. After this, carefully put the plant in place and make sure that the roots are spread on all of the sides of the mount. Add more potting soil until all the white part at the base of the foliage is covered.
It's important to make sure that the point where the roots and foliage meet is not more than 1 inch below the surface. When the plant is positioned and the soil added on top firm the soil and water well.
In case you have bought a daylily plant that's already potted in a nursery pot (that's at least a gallon in size) you must repot it in a new container. It's important to make sure that the plant is slightly above the soil line of the pot.
How to Care for Your Daylily
Here are some general tips on how to care for your daylily. First of all, it's important to make sure that the soil is always moist. In the spring and summer your plant will make scapes (flower stalks) and flower, so it's important to give it plenty of water in this time of year. If you provide too little water during this period it will reduce the amount of flowers the plant will produce.
Another thing to keep in mind is to water deeply, until you see the water flowing out of the bottom of the pot. Make sure not to water the leaves or crown of the plant. You can cover the surface of the pot with mulch. This will cut down the need for watering because it will reduce evaporation.
In case you plant your daylilies in spring you don't need to fertilize them during that first spring. The reason is that most potting soils come pre-mixed with some form of fertilizer. Therefore, you should fertilize your plant the first time during the following summer, during the time your daylilies are flowering for the first time. It's best to choose a fertilizer with the lower first number (nitrogen) than the second two numbers (phosphorus and potash).
The next year, you should fertilize your plants in the spring, when they start to develop some new growth. After that, fertilize them in the summer. Make sure not to go overboard with the fertilizer - you really don't have to use much.
Removing spent flowers will encourage the plant to re-bloom so you will keep your daylilies looking rich and beautiful. It's important to always remove damaged, diseased and dead foliage as soon as you notice it.
Photo credit: Renee Grayson
1 Comments
Can Day Lilies be planted in the fall?